Monday, November 19, 2012

Kale Sesame Chips

I wanted something to go with our pumpkin sauce pork-chop lion, so I decided to make some kale chip "jungle leaves".

A local blogger friend of mine, Emily, has the basic recipe that I used here.  I substituted coconut oil instead of EVOO, and sprinkled mine with sea salt and sesame seeds.  They tasted amazing!

Kale:
+

Coconut oil, salt, and sesame seeds:
=
Yum!!


These really were easy and delicious and they made a great side with the pumpkin sauce lion.


Pumpkin Sauce and Pork-chop Lion

Today's fun food was made to look like a lion.  It was also grain-free and dairy-free.


To make the lion's mane I used Ancient Harvest Quinoa veggie curls.  Follow the instructions on the back of the box precisely, I boiled mine for a couple minutes longer than suggested and they came out a little softer than I would have preferred.


The pumpkin sauce contained:

Pumpkin puree - 1 (15 oz.) can
Chicken stock - 2/3 c.
Coconut milk - 1/2 c.
White onion - 1/2 medium onion, chopped
Kale - hand full, finely chopped
Salt - 1 tsp.
Pepper - 1/2 tsp
Curry spice blend (cardamom, ground tumeric, ground cumin, coriander, chili powder) - 1 tbsp
Pumpkin spice blend (cinnamon, ginger, nutmeg, all spice) - 1 tsp.

Combine all ingredients in a medium sauce pan and cook over medium heat until it bubbles.  Be sure to stir often to avoid burning the bottom.


While I made the sauce I had these cooking.  Boneless pork-chops, seasoned and popped into the oven at 350 degrees F for about 30-45 minutes.


To make the lion, I put the pasta and sauce on the plate first and topped it with a pork chop face.  I also used two small pieces of pork chop for the ears.  The details on the face were made with green, yellow and red pepper (eyes, mouth and whiskers), an almond (nose), black beans (pupils), and a cauliflower (muzzle).


We ate our lions with a side of "Jungle Leaves" (aka. kale chips), recipe here.

Homemade Bit-O-Honey... or not...

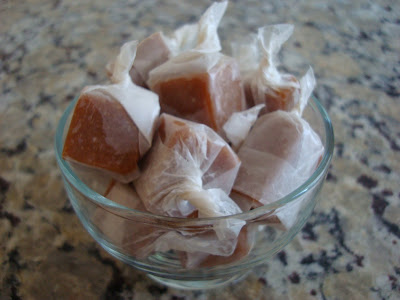
I couldn't decide whether or not to post this recipe because, as the title implies, the intent was to make a homemade version of Bit-O-Honey.  My version, though it did taste good, didn't quite capture the same flavor as the official candy.  My family loved this recipe though, so I decided to post it.

This was also my first time attempting to make homemade candy, so I used a combination of the ingredients listed on the original candy and the instructions for a honey caramel candy found at Naturally Sweet Recipes.

I simplified the original list and ended up with 6 ingredients (one not pictured).


Honey - 1 c.
Coconut milk - 1/4 c.
Almond Meal - 1/4 c.
Coconut Oil - 2 Tbsp.
Vanilla Extract - 1 Tsp.
Almond Extract - 1/2 Tsp.

Pour one cup of honey into a sauce pan and bring to a boil.


Continue to boil until the honey reaches "hard crack stage", which is just over 300 degrees F on my candy thermometer. If you don't have a thermometer, I found this page that explains another way to check candy stages.  To avoid burning the honey, I kept the stove top on the lowest possible heat to keep the boil and continually stirred the honey with a wooden spoon.


Once the honey hits "hard crack" stage, immediately remove it from the heat and add the other ingredients (coconut milk, coconut oil, almond meal, vanilla extract and almond extract). Stir until everything is combined.

Pour mixture into a parchment lined (or well oiled) dish and place in the refrigerator for at least an hour or until cooled and hardened.
*I also had a random candy mold lying around so I put a little but into the mold to see what would happen.


Once everything was cooled (which took about an hour in my fridge), I took them out to make individual candies.

The molds were easy, I just turned the whole thing over and applied slight pressure to the middle of each candy mold and they popped right out.


To make the rest of the candies, I pulled the "honey brick" out of the container and used a large knife to cut individual pieces.  The honey brick was fairly hard so I had to use a good amount of pressure and a back and forth rocking motion to get through it.


I cut the brick into bite size squares and  wrapped each piece individually using sections of wax paper.


Keep candy in the refrigerator until ready to eat.


Final notes:

Although my family enjoyed my recipe "as is",  I still feel the recipe needs some tweaking.  The flavor was a little strong for my taste, so I think next time I'll omit the almond extract completely.  The amount of coconut oil can probably be reduced as well.

I'd also like to use this recipe as a base to experiment with making honey lemon throat drops.  


Saturday, October 6, 2012

Pumpkin-Nut Pie

Today I told the boys that we'd make a pie.  Gabe wanted pumpkin pie and Rique wanted pecan... so I decided to combine the two.  And in line with our new healthy lifestyle, I made it free of grain, dairy and processed sugars.

This was my first time using all healthy, natural ingredients in my baking so it was definitely a new lesson for me.  I was very surprised with how great this tasted.  And though the visual presentation definitely needs some work, the recipe is a keeper for our family.

Give this recipe a try, you will definitely be glad you did!


Pumpkin-Nut Pie (base/crust):


1/2 c. almond meal
1/2 c. pecans
1/2 c. walnuts
1/4 c. melted coconut oil
1/4 tsp. sea salt

Coarse grind walnuts and pecans in a food processor (final product should be smaller than "chopped" nuts, but bigger than the almond meal).  Mix almond meal, pecans, walnuts, coconut oil and sea salt in a bowl. Press mixture into the bottom of a 9 1/2 " pie plate (I used glass).


Pumpkin-Nut Pie (filling):
1 can of 100% pumpkin puree (approx. 15 oz)
1/2 cup full fat coconut milk
1/2 cup raw, wild honey
2 eggs
3 tsp. "pumpkin pie spice" (cinnamon, ginger, nutmeg and allspice)
2 tsp 100% pure bourbon vanilla extract
1/2 tsp. sea salt

Throw everything in a bowl and mix, mix, mix.  (My little minions helped me with the mixing.)


Pour filling into the pie dish and throw in the (pre-heated) oven at 350 degrees F for about 30 minutes or until the filling starts to solidify.  While that cooks, make your topping.


Pumpkin-Nut Pie (topping):

1/2 c. chopped walnuts
1/2 c. chopped almonds 
1/2 c. chopped pecans
1/4 c. raw, wild honey
1/8 c. melted coconut oil
2 tbsp. ground flaxseed
1 tbsp. cinnamon
1 tbsp. ground nutmeg
Combine all ingredients.  Remove pie from oven at 30 minutes mark, distribute topping evenly over pie filling and place back in the oven for an additional 25 minutes.

Remove pie from oven, let cool completely, and serve.


The picture above also has an extra coconut/honey/vanilla drizzle and some extra cinnamon sprinkled on it, but I ate mine plain and it was amazing without the "extras".

If you'd like a dairy-free whipped cream for the top, I found a great recipe here.

Hope you enjoy this dessert as much as we did!

Fiesta Coconut Chicken Bites and Crispy Veggie Strips

Today I asked my little guys what they wanted for lunch and they responded with a request for chicken nuggets and onion rings.  Rather than dig some frozen, over-processed junk from the freezer, I decided to do some experimenting.

I came up with a great lactose and grain-free lunch.  Recipes still need a little tweaking (there was definitely a learning curve, as this was my first time using some of these healthy alternative ingredients) but I'll give you the initial recipe.

P.S. - I didn't add any salt to the recipes as I am currently restricting my sodium intake, but feel free to add it to either of the "breading" recipes below or add a sprinkle after they come out of the oven.


Fiesta Coconut Chicken Bites

Roughly 2 cups unsweetened shredded coconut (I used Bob's Red Mill)
1 lime (you'll be using the rind for zest and the rest for juice)
Coarse ground pepper (a couple shakes, sorry I didn't measure this part, just "eyeballed it")
1 tsp. - Cumin
3 tsp. - Mrs. Dash Fiesta Lime (salt free) seasoning
Egg Whites (enough to coat all the chicken)
Boneless skinless chicken breast (I used about 2 lbs)


In a bowl, combine the coconut, cumin, lime zest, fiesta lime seasoning and pepper.  Use a fork to mix well.
In a separate bowl, add egg whites and lime juice from the whole lime.  I just hand squeezed it in, but if you have a juicer, that's great too.

There are two ways you can do the next step.
The traditional, dip chicken in egg white mixture then roll/shake/dip in the coconut mixture.
or
Sprinkle half the coconut mixture on a large plate or platter, dip the chicken in the egg white & lime juice, shake off excess liquid and set the chicken pieces on top of the plate of coconut mixture, sprinkle the rest of the mixture on top of the chicken.

I did it the "traditional" way first, but halfway through I noticed my coconut mixture was getting too wet and was sticking to itself instead of to the chicken.  The next batch I made I used the second way and the chicken was more fully coated in the coconut.  Use whichever way you prefer, the first is a faster process but I recommend the second myself.

Place on a greased baking sheet (I coated mine with coconut oil) and pop in the oven at 380 degrees F for about 15 minutes, turning halfway through.  Keep an eye on these and try not to overcook them, the coconut gets really dry if you leave them in too long.


Crispy Veggie Sticks

1/2 large onion
1/2 green bell pepper
1/2 yellow bell pepper
1/2 green bell pepper
1 cup of cauliflower
2 cups almond meal (I used Bob's Red Mill)
3 tbsp dried parsley
2 tsp garlic powder
2 tsp onion powder
Coarse ground black pepper (to taste)
Egg Whites (enough to coat all the veggies)


In a bowl, combine almond meal, pepper, parsley, garlic and onion powder.
Cut onion and bell peppers into strips and the cauliflower into bite size pieces.

I used the same process for the veggies that I used for my second batch of chicken.  Sprinkled half the almond meal mixture on a platter, dipped all the veggies in egg white and placed them back down on the platter of almond meal mixture.  I then sprinkled the top of them with the remaining mixture.


Place on a greased baking sheet (again, I coated mine with coconut oil) and put in the oven at 380 degrees F for about 20 minutes. Flip them at the 10 minute mark and put back in oven for the remaining 10 minutes.


My boys love sauces so I also made a "dip" for them.  It was a mixture of stone ground mustard, raw wild honey and horseradish. 


My boys gobbled these up, then asked for seconds... and thirds!


Wednesday, September 26, 2012

The Grouchy Ladybug Snack

Today during circle time, we read one of the boys' favorite books, The Grouchy Ladybug by Eric Carle.  


Shortly after reading the book, it was time for me to make morning snack for the kiddos and The Grouchy Ladybug was still on my mind.  Mostly because the boys kept repeating, "Hey you!  You wanna fight!?"  So, I used this page from the book as the inspiration for today's food art.


Here is MY version:


The sun is pineapple, the praying mantis is cucumber with tomato eyes, the ladybug is black beans and a cherry tomato and carrots for the ground.  I used a toothpick and some black food coloring to "paint" the dots on the wings and the pupils on the mantis eyes.  I realized later that I probably should have put the carrots at an angle to better imitate the brush strokes in the book and maybe added a few red and yellow  bell pepper strips.  Next time.


Making grain-free and dairy-free food art is a lot more complicated than when I could just cut a "sammy" and some cheese into a fun shape, but I think it turned out pretty good.  Most importantly the boys loved the theme and they devoured this healthy snack!  


Tuesday, September 25, 2012

My First "20 Chore Tuesday"

20 chore tuesday

I love lists!  I am way more productive and organized if I have a visual of what I need done, so when my friend Emily over at Joyful Abode started doing "20 Chore Tuesday" a couple weeks ago, I knew I needed to join in the fun.

This is today's 20 chores:


Ok, so maybe not all of the things on the list are "chores" in the traditional sense, but they are things that I need to make sure get done. When I made the list, I figured quite a few of the items wouldn't get crossed off, but I was pleasantly surprised with my results.


I got about 18 things from the list finished, plus some things that weren't on the list.  So, all-in-all, I'd say this was a successful Tuesday.  Thanks to Emily for helping provide some motivation!


Thursday, August 9, 2012

Teddy Bear Picnic

Today's lunch theme was "Teddy Bear Picnic".


I started with a peanut butter and jelly sandwich and used a simple circle cookie cutter to punch out a round.  I then used two different kinds of cheese (cheddar and provolone) to make triangle shaped rays.  He has a celery smile and fruit roll up (green apple) sunglasses.


Next I used a celery stalk and grapes (cut in half) to make a tree.  There is also "grass" (chopped lettuce and spinach) and 2 little bunnies (Annie's organic fruit snacks - strawberry).


For the picnic I used 2 Teddy Grahams and an apple slice cut into a square (with strips of it's skin) as the blanket.  There are also "ants" on the blanket (protein bar crumbs) because no picnic is complete without ants invading the area.


The boys also had homemade watermelon popsicles for "dessert".  We made them last night with our popsicle mold (found at Walmart for three dollars), Minute Maid watermelon juice, little chunks of watermelon and a splash of lemon juice.


They were very refreshing and according to my 4-year-old, "delicious".


Happy kids!


-J


Tuesday, August 7, 2012

Shrimp and Bacon Zucchini Boats

My newest cooking experiment turned out great!  I was making salmon and needed something to go with it, so I came up with the following recipe for yummy zucchini boats!


I didn't actually expect them to turn out as good as they did so unfortunately, I didn't take pictures as I made them, but I do have a few pictures of the finished product.

Ingredients:

Zucchini
Shrimp
Carrots
Garlic
Onion
Red Pepper
Green Pepper
Bacon Bits
Tomato
Spinach
Mozzarella
Provolone
  • Cut zucchini in half and use a spoon to carve out the center area, leaving a "boat" (keep the part you carved out, you'll be using it for the stuffing)
  • Grate carrots, garlic and zucchini center (from last step) into a bowl
  • Finely dice shrimp, onion, red pepper and green pepper and add to bowl
  • Toss everything from the bowl into a pan and saute with a little bit of butter and your choice of seasoning (I used McCormick Perfect Pinch Vegetable).  When done, drain (if needed) and add back to the bowl.
  • Finely dice spinach and tomato (de-seed first) and toss in the bowl
  • Grate mozzarella into bowl
  • Mix well (the cheese should melt and help the mixture to stick together) 
  • Spoon mixture into the zucchini boats and sprinkle top with bacon bits
    * Note:  I had extra stuffing so I baked it in a little stoneware ramekin


  • Bake at 425 for 20 minutes 
  • At the 15 minute mark, pull them out and place thinly sliced provolone to top, put back into the oven to continue cooking for the last 5 minutes


You'll love these!  They went perfectly with our lemon herb salmon, butter parmesan pasta and sweet corn on the cob.  It was an all around hit with everyone from the 2-year-old all the way up to the Grammy (we won't mention her age).  I hope you enjoy it as much as we did!


Wednesday, April 18, 2012

Pancake Flower - Breakfast

Breakfast this morning was pancakes and fruit made into a flower shape.  

I started out making petal shaped pancakes (long ovals).  I used Krusteaz Wheat and Honey pancakes and instead of water, we used milk.


Then I chopped up the strawberries and bananas.


Added some vanilla yogurt to a small bowl, sprinkled it with some multicolored nonpareils and added some Yogurt O's (available at Fresh & Easy).


Then I arranged everything on the plate.  Fruit went on top of the pancakes and I drizzled them with honey.  Th yogurt bowl went into the center of the "petals".


Yum!

Friday, April 13, 2012

Fun Snack Tray

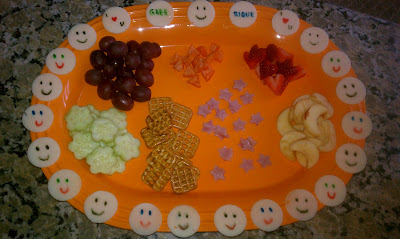
The boys were ready for snack so I decided to put together a fun snack tray.  Something like this would be great for those of you who have picky eaters that don't like their food to touch, it's still fun and different but each food stays with it's group.

I started out just gathering what I wanted to give the boys for snack.  We like to do finger foods for snacks so I decided on grapes, carrots, strawberries, apples, ham, waffle pretzels, cucumber and provolone cheese.

First I cut everything into flat disks and used my fondant cutters to punch out shapes from the food.  For those of you who don't know, fondant cutters are like mini cookie cutters, they also do make mini cookie cutters but they are harder to find.  I found both the fondant cutters I used, and these mini cookie cutters (Noah's Ark Set and Romantic Set) at Michael's.


After I punched everything out and arranged it on the tray, I drew on the provolone with Wilton FoodWriter Pens.  I kept it simple: I <3 U, Gabe, Rique and a bunch of smiley faces.  I've used the pens with great success on other foods, but apparently cheese is too soft because it was a lot harder to use them on the provolone.  I think next time I'll just use food coloring and a toothpick or thin paintbrush.


Here's the finished product:


My boys love fun food, even when it's just one of my simple creations.  My favorite part of snack was watching my boys being sweet with each other and sharing their food.


Happy Eating!